Rabu, 05 Februari 2025
Gable Roof Shed Insulation Guide: Keep It Warm in Winter
Gable Roof Shed Insulation Guide: Keep It Warm in Winter
Maintaining a comfortable temperature within a gable roof shed, particularly during colder months, necessitates a comprehensive understanding of insulation principles and practical application. This guide provides a detailed overview of effective insulation strategies for gable roof sheds, focusing on maximizing thermal performance and minimizing energy waste. Proper insulation not only enhances comfort but also protects stored items from damage caused by fluctuating temperatures and moisture.
Understanding Gable Roof Shed Construction and Heat Loss
Before delving into insulation techniques, it's crucial to understand how heat escapes from a gable roof shed. Gable roofs, characterized by two sloping sides meeting at a ridge, present unique challenges regarding insulation due to their relatively large surface area and the potential for air infiltration at various points.
Common Heat Loss Pathways in Gable Roof Sheds
Heat loss from a gable roof shed occurs primarily through several pathways:
- Roof: The roof is a significant source of heat loss, particularly in older sheds lacking adequate insulation. Conduction through the roof sheathing, rafters, and roofing materials contributes significantly to overall energy loss.
- Walls: Similarly, the walls of the shed, if improperly insulated, allow for considerable heat transfer to the exterior environment. This is particularly true for sheds with single-layer construction.
- Doors and Windows: Gaps around doors and windows, even seemingly minor ones, can create significant air infiltration, leading to substantial heat loss. Poorly fitting or outdated doors and windows are prime culprits.
- Floor: The shed's floor, especially if built directly on the ground, can conduct heat away from the interior space, especially during periods of frost or freezing temperatures.
Factors Influencing Heat Loss
Several factors exacerbate heat loss in a gable roof shed. These include:
- Climate: Colder climates naturally lead to greater heat loss, requiring more robust insulation strategies.
- Shed Size and Orientation: Larger sheds with greater surface area lose heat more readily than smaller ones. Shed orientation relative to the sun can also influence heat gain and loss.
- Construction Materials: The type and quality of building materials used in the shed's construction significantly impact its thermal performance. For instance, solid wood framing provides better insulation than lightweight metal framing.
- Air Leakage: Air leakage through cracks, gaps, and poorly sealed joints contributes significantly to heat loss. This should be addressed comprehensively during the insulation process.
Insulation Materials and Methods for Gable Roof Sheds
Selecting appropriate insulation materials and employing correct installation techniques are pivotal to effective shed insulation. The choice depends on various factors, including budget, available space, and desired thermal performance.
Common Insulation Materials
Several insulation materials are suitable for gable roof sheds:
- Fiberglass Batt Insulation: A cost-effective and readily available option, fiberglass batt insulation is easy to install between wall studs and rafters. It comes in various thicknesses to suit different needs.
- Mineral Wool Insulation: Similar to fiberglass in application, mineral wool (rock wool or slag wool) offers excellent thermal performance and fire resistance. It's often a preferred choice for environmentally conscious builders.
- Spray Foam Insulation: Spray foam insulation offers superior air sealing capabilities and high R-value, filling gaps and crevices effectively. However, it's more expensive and requires professional installation.
- Rigid Foam Board Insulation: Rigid foam boards (polyurethane or polystyrene) provide excellent insulation and are useful for exterior applications, improving the shed's overall thermal envelope. They can also be used for underlayment in the roof.
Insulation Techniques for Gable Roof Sheds
The insulation process involves several steps, and the specific techniques depend on the chosen materials:
- Roof Insulation: Insulating the roof is crucial. This often involves installing insulation batts between rafters, ensuring a continuous layer to minimize heat transfer. Additional underlayment can further enhance performance.
- Wall Insulation: Walls can be insulated using batt insulation, spray foam, or rigid foam boards. Pay close attention to sealing gaps around windows and doors to prevent air leakage.
- Floor Insulation: For sheds with concrete floors, consider using rigid foam insulation boards beneath the flooring. For ground-level floors, consider adding a layer of insulation between the ground and the subfloor to reduce heat loss.
- Air Sealing: Regardless of the insulation material chosen, proper air sealing is paramount. Use caulk, weatherstripping, and expanding foam to seal gaps and cracks around windows, doors, and other openings.
Maximizing Insulation Effectiveness in Gable Roof Sheds
Beyond material selection and installation, several strategies can further enhance insulation effectiveness.
Vapor Barriers and Moisture Control
Proper vapor barrier installation is crucial to prevent moisture buildup within the shed's walls and roof. A vapor barrier should be placed on the warm side of the insulation to prevent condensation from forming within the insulation itself, which can lead to mold and rot. The specific placement will vary depending on climate conditions.
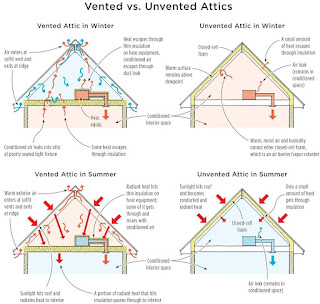
Ventilation
While insulation minimizes heat loss, adequate ventilation is necessary to prevent moisture accumulation. This is especially important in sheds used for storage of items that may generate moisture. Ensure proper ventilation by installing vents at the highest and lowest points of the shed.
Choosing the Right R-Value
The R-value indicates the insulation's resistance to heat flow. Higher R-values translate to better insulation. The optimal R-value for your shed will depend on your climate and desired level of thermal performance. Consult local building codes and energy efficiency guidelines for recommendations.
Conclusion
Insulating a gable roof shed effectively requires a holistic approach encompassing proper material selection, meticulous installation, and attention to detail regarding air sealing and moisture control. By carefully considering the various factors discussed in this guide, you can significantly improve the thermal performance of your shed, creating a more comfortable and energy-efficient space suitable for year-round use.
Remember to consult with building professionals or experienced contractors if you are unsure about any aspect of the insulation process. Proper insulation not only enhances comfort and protects stored items but also contributes to a more environmentally friendly approach to shed management. A well-insulated shed is a valuable asset, providing years of reliable service in all weather conditions.
Insulated 8x8 Shed Plans: Stay Warm in Winter and Cool in Summer
Insulated 8x8 Shed Plans: Stay Warm in Winter and Cool in Summer
So, you're thinking about building an 8x8 shed, but you want more than just a basic storage unit. You want a space that's comfortable year-round, a cozy retreat in winter and a cool haven in summer. You're in the right place! Building an insulated 8x8 shed is totally doable, and this guide will walk you through everything you need to know.

Why Insulate Your 8x8 Shed?
Let's be honest, an uninsulated shed is pretty miserable in extreme temperatures. Imagine trying to work on your projects in a freezing cold shed in December, or sweltering in a sauna-like shed in July. Not fun, right? Insulating your shed dramatically improves its usability, transforming it from a simple storage space into a functional workshop, hobby room, or even a small guest house. The added insulation pays for itself in comfort and extended usability.
Here are a few key benefits of insulation:
- Temperature Regulation: Keeps the interior warm in winter and cool in summer, making it comfortable to use year-round.
- Energy Efficiency: If you plan on using electricity (for lighting, tools, or heating/cooling), insulation reduces energy consumption and lowers your utility bills.
- Protection from Condensation: Insulation helps prevent moisture buildup, which can lead to mold and mildew damage.
- Increased Property Value: A well-built, insulated shed adds value to your property.
- Noise Reduction: Insulation can help block out unwanted noise from the outside world.
Planning Your Insulated 8x8 Shed
Before you even think about picking up a hammer, you need a solid plan. This involves more than just sketching something on a napkin (although that's a great starting point!).

Choosing the Right Materials
The materials you choose will significantly impact the cost and effectiveness of your insulation project. For the shed's frame, pressure-treated lumber is a popular and durable choice. For the siding, consider options like vinyl, metal, or even shiplap for a more rustic look. Remember to choose materials that are suitable for your climate and budget.
Selecting Insulation
There are several types of insulation to consider, each with its own pros and cons:
- Fiberglass Batt Insulation: A common and affordable choice, easy to install between wall studs and joists.
- Spray Foam Insulation: More expensive but provides a superior air seal and excellent insulation value. It's also great for filling irregular spaces.
- Rigid Foam Insulation (e.g., XPS or Polyiso): Durable and effective, often used for sheathing or under siding.
- Cellulose Insulation: Made from recycled paper, it's environmentally friendly and provides good insulation.
The R-value (resistance to heat flow) is a crucial factor. The higher the R-value, the better the insulation. Your climate will influence the R-value you need. Consult local building codes and consider the climate zone where you live.
Foundation Considerations
A solid foundation is crucial for any shed, especially an insulated one. You have several options:
- Concrete Slab: Provides a strong, level base and is excellent for insulation but requires more labor and materials.
- Concrete Piers: A more affordable alternative to a full slab, but requires careful leveling.
- Gravel Base: A simple and inexpensive option, but provides less stability and insulation.
No matter which foundation you choose, consider adding a vapor barrier to prevent moisture from seeping into your shed.
Construction Process: Step-by-Step
This is where the rubber meets the road! Building an insulated shed is a project that requires time and effort, but it's very satisfying. I can't give you precise, step-by-step instructions here for the entire process. That would be an entire book in itself! However, I can give you a general idea of what's involved.
Framing the Walls and Roof
This involves building the frame of your shed using pressure-treated lumber. Ensure you follow proper framing techniques to create a strong and stable structure. This is critical, as your insulation will be attached to this frame.
Installing the Insulation
Once the framing is complete, you can install the insulation. Carefully fit the chosen insulation material into the wall cavities and ceiling joists, ensuring a snug fit to minimize air gaps. For spray foam, you'll need to hire a professional.
Adding a Vapor Barrier
A vapor barrier is essential to prevent moisture damage. This is usually a plastic sheeting that's installed over the insulation before the wall sheathing goes on. This helps keep the warm, moist air inside the shed during winter and prevents moisture build-up from outside in the summer. This is crucial for the long term health of your shed.
Exterior Sheathing and Siding
Once the insulation and vapor barrier are in place, install the exterior sheathing (plywood or OSB). This will provide a solid surface for your siding to attach to. Finally, install your chosen siding.
Roofing and Finishing Touches
Install the roofing material, choosing something durable and weather-resistant. Don't forget about adding windows and a door, ensuring that they are properly sealed to maintain insulation. Add finishing touches like trim and paint, and you're almost done!
Commonly Asked Questions
Q: How much will it cost to build an insulated 8x8 shed?
A: The cost varies greatly depending on materials, labor costs, and your chosen features. Expect to spend anywhere from $2,000 to $8,000 or more.
Q: Do I need to obtain permits for building a shed?
A: Permit requirements vary by location. Check with your local building department before starting construction.
Q: Can I build an insulated shed myself?
A: While it's possible, building an insulated shed is a significant undertaking. If you lack experience, consider hiring a contractor or getting help from experienced DIYers.
Q: How can I improve the ventilation in my insulated shed?
A: Proper ventilation is crucial. Install vents at the top and bottom of the shed to allow for air circulation and prevent moisture buildup.
Q: What type of door should I use for an insulated shed?
A: A solid core door with weather stripping is ideal for maintaining insulation.
Building an insulated 8x8 shed is a rewarding project. While it may seem daunting at first, careful planning and execution can result in a space you'll enjoy year-round! Remember to always prioritize safety and consult local building codes throughout the process.
DIY Shed Cabin Plans: Convert Your Shed into a Cozy Getaway
DIY Shed Cabin Plans: Convert Your Shed into a Cozy Getaway
Tired of the same old routine? Yearning for a peaceful retreat without the hefty price tag of a new cabin? Transform that humble shed into your personal sanctuary! This guide provides detailed plans to convert your existing shed into a cozy, functional getaway, perfect for relaxation, hobbies, or even overnight guests. We'll walk you through the essential steps, from initial assessment to the final touches, empowering you to create a space uniquely your own.

Assessing Your Shed: The Foundation for Success
Before you grab your toolbox, thoroughly assess your shed's current condition. Inspect the structure for any signs of damage, rot, or pest infestations. Check the foundation for stability and levelness; uneven ground can cause significant problems down the line. Consider the shed's size and layout. A small shed might be perfect for a writing nook, while a larger one could accommodate a sleeping area and small kitchenette. Accurate measurements are crucial for planning your conversion.

Essential Considerations:
- Structural Integrity: Can the shed support the added weight of insulation, new walls, and furnishings?
- Window and Door Placement: Optimize natural light and ventilation. Consider adding more windows if needed.
- Electrical and Plumbing: Assess the existing systems or plan for necessary upgrades, ensuring compliance with local building codes. Consult with a qualified electrician and plumber if needed.
Designing Your Cozy Cabin Interior: From Shed to Sanctuary
Now for the fun part: designing your ideal cabin interior! Think about the overall vibe you want to create. Rustic charm? Modern minimalist? Choose a color palette that complements your style and reflects the natural surroundings. Prioritize functionality. Sketch a floor plan, experimenting with furniture placement to maximize space. Consider incorporating built-in storage solutions to keep things tidy and organized. Don't forget about adequate lighting – a combination of natural and artificial light will create a welcoming atmosphere.
Key Design Elements:
- Insulation: Proper insulation is vital for temperature regulation and energy efficiency. Choose a suitable material based on your climate and budget.
- Flooring: Select flooring that's both durable and aesthetically pleasing. Options range from easy-to-maintain vinyl to charming wood planks.
- Wall and Ceiling Finishes: Consider shiplap for a rustic look, or paint for a cleaner, modern feel. Textured wallpaper can add personality and warmth.
Construction and Finishing Touches: Bringing Your Vision to Life
With your design finalized, it's time to get your hands dirty! Start by addressing any structural repairs or upgrades. Insulate walls and ceilings, install new flooring, and finish the walls and ceiling according to your chosen design. Carefully install new windows and doors if necessary. Next, focus on the finer details: install lighting fixtures, add electrical outlets, and fit your chosen furniture and decor. Don't forget about adding personal touches—photos, artwork, and plants will help transform the space into a truly personal retreat. Remember to always prioritize safety and adhere to local building codes throughout the process.
Finishing the Details:
- Electrical Wiring: Ensure all electrical work meets safety standards and is properly grounded.
- Plumbing Installation (if applicable): If you're adding a sink or toilet, ensure proper ventilation and drainage.
- Decor and Furnishings: Add your personal touches to complete the transformation!
Converting your shed into a cozy getaway is a rewarding project that combines creativity, practicality, and personal expression. With careful planning and execution, you can create a unique sanctuary perfect for relaxation and enjoyment, all within the confines of your own backyard. So, roll up your sleeves, and embark on this exciting DIY adventure!
8x8 Shed Foundation Plans: The Best Base for Stability and Durability
8x8 Shed Foundation Plans: The Best Base for Stability and Durability
So, you're building an 8x8 shed! That's awesome. A great little space for storage, a workshop, or even a cozy potting shed. But before you start nailing together walls, you need to think about the foundation. A solid foundation isn't just about looking good; it's the key to a long-lasting, stable shed that will withstand the test of time (and those occasional summer storms!). Let's dive into the best foundation options for your 8x8 shed, keeping things simple and straightforward.
Choosing the Right Foundation: It's All About the Soil
The best foundation for your 8x8 shed depends heavily on your soil type. Seriously, this is the most important factor! You wouldn't build a house on quicksand, right? Similarly, the wrong foundation on the wrong soil can lead to a leaning, sinking, or even collapsing shed. Before you even think about concrete or gravel, do a little soil investigation. You can usually get a sense of your soil type by digging a small hole – is it mostly clay, sand, loam, or something else? If you're unsure, consider contacting a local landscaping professional or your city's planning department; they might have soil surveys for your area.
Understanding Your Soil Types
Different soils behave differently. Let's quickly break it down:
- Clay Soil: This expands and contracts significantly with moisture changes, making it tricky for foundations. You'll likely need a more robust foundation.
- Sandy Soil: Relatively well-draining, but it can be loose and unstable. You might still need some reinforcement.
- Loam Soil: A mixture of sand, silt, and clay, loam is generally a good option, offering a decent balance of drainage and stability.
Once you understand your soil, you can start to narrow down your foundation choices. Let's look at some popular options.
Popular Foundation Options for Your 8x8 Shed
There are several ways to build a solid foundation for your 8x8 shed, each with its pros and cons. Let's discuss the most common choices:
1. Concrete Slab Foundation
This is often considered the most durable and long-lasting option, especially for heavier sheds or areas with poor soil drainage. A concrete slab provides a solid, level base and is resistant to pests and rot. However, it's also the most expensive and labor-intensive option, often requiring professional help for pouring and finishing.
2. Gravel Base Foundation
A gravel base is a budget-friendly and relatively simple option, particularly suitable for well-draining soils. It involves creating a level base of compacted gravel, often topped with a layer of weed barrier fabric to prevent weed growth. It offers good drainage, but it might not be the most stable option for heavier sheds or areas prone to shifting soil.
3. Pier and Beam Foundation
This option uses concrete piers or pressure-treated wood posts set into the ground at regular intervals. These support a framework of beams that form the foundation for your shed. This is a good choice for areas with sloping ground or areas where drainage is a concern. It allows for better ventilation and is less expensive than a concrete slab but requires more carpentry skills.
4. Wooden Frame Foundation
A wooden frame foundation uses pressure-treated lumber, typically 4x4 posts or beams, to create a base for your shed. This is often the cheapest and easiest option, but it's crucial to use properly treated lumber to prevent rot and pest damage. It's not ideal for particularly wet areas or unstable soil.
Building Your Chosen Foundation: Step-by-Step (Gravel Base Example)
Let's walk through a simple gravel base foundation as an example. Remember, always check local building codes and obtain necessary permits before starting your project!
1. Site Preparation:
Clear the area of vegetation, debris, and any rocks or uneven patches. Mark out the 8x8 foot area for your shed using stakes and string. Dig down to a depth of about 4-6 inches, making sure the area is level.
2. Compacting the Gravel:
Add a layer of gravel (about 4-6 inches), and thoroughly compact it using a hand tamper or a plate compactor (rental available at most home improvement stores). This is crucial for stability! Add more gravel as needed, ensuring a level surface. A slightly sloped surface might even be ideal to aid drainage.
3. Weed Barrier (Optional):
Lay down a layer of landscape fabric to prevent weeds from growing through the gravel.
4. Shed Placement:
Place your shed's base directly on the compacted gravel, ensuring it's level and square. Anchor it using appropriate fasteners to the base. Congratulations, you've built your foundation!
Commonly Asked Questions
Here are some frequently asked questions about building a shed foundation:
- Q: How much does a shed foundation cost? A: The cost varies greatly depending on the foundation type and materials used. A gravel base is the most affordable, while a concrete slab is the most expensive.
- Q: Do I need a permit to build a shed? A: Check with your local building department. Permits are often required for sheds exceeding a certain size or complexity.
- Q: How long does it take to build a shed foundation? A: This depends on the foundation type and your experience. A simple gravel base might take a day, while a concrete slab could take several days.
- Q: What tools do I need? A: This depends on your chosen foundation but will likely include shovels, rakes, a level, measuring tape, stakes, string, and possibly a compactor.
- Q: Can I build the foundation myself? A: Yes, for simpler foundations like gravel bases, you can likely DIY. For more complex foundations like concrete slabs or pier and beam systems, professional help is often recommended.
Remember, building a solid foundation is the cornerstone of a long-lasting shed. Take your time, plan carefully, and don't hesitate to seek professional advice if needed. Happy shedding!
12x12 Shed Plans: A Mid-Sized Shed for Any Purpose
12x12 Shed Plans: A Mid-Sized Shed for Any Purpose
So, you're thinking about building a shed? That's awesome! A shed can be a total game-changer, adding valuable storage space and potentially even extra workshop area to your property. A 12x12 shed is a really popular size – it's big enough to be seriously useful, but not so massive that it becomes a huge undertaking. This guide is going to walk you through everything you need to know about planning and building your own 12x12 shed.

Why Choose a 12x12 Shed?
Before we dive into the nitty-gritty, let's talk about why a 12x12 shed is such a popular choice. It's the Goldilocks of shed sizes – not too big, not too small, just right for a lot of people. Here's why:
- Versatile Storage: Plenty of space for lawnmowers, garden tools, bikes, seasonal decorations, and more! You can even section it off to create different zones.
- Workshop Potential: With enough room for a workbench, some shelving, and potentially even a small compressor, it's perfect for a hobbyist workshop.
- Manageable Size: It's not so big that building it becomes an overwhelming project. While it will still require effort, it's achievable for many DIYers.
- Relatively Affordable: Compared to larger shed structures, the materials and time investment for a 12x12 shed remains relatively manageable.
Of course, the best size shed for you will depend on your specific needs and available space. But a 12x12 is a great starting point for many homeowners.
Planning Your 12x12 Shed Project
Building a shed isn't just about hammering nails; it requires careful planning. Here's what you need to consider:

1. Location, Location, Location!
Where will your shed go? Consider these factors:
- Accessibility: Will you need a path leading to it? Is it close enough to your house for easy access to utilities?
- Sunlight and Shade: How much sun exposure do you want? Will you need shade for certain items?
- Drainage: Ensure the ground is level and drains well to prevent water damage.
- Local Regulations: Check your local building codes and homeowner's association rules before you even think about breaking ground. They often have requirements about shed size, placement, and building permits.
2. Shed Design and Materials
Think about the style and materials you want. Do you want a traditional wooden shed, a more modern metal structure, or something in between? Wood offers a classic look and allows for customization, while metal is typically more durable and low-maintenance.
- Foundation: You'll need a solid foundation. Options include a concrete slab, concrete piers, or a gravel base. The best choice depends on your budget and soil conditions.
- Framing: Pressure-treated lumber is crucial for longevity. Carefully plan your framing to ensure structural integrity.
- Roofing: Consider the climate and choose a roofing material that will withstand the elements. Asphalt shingles are a popular and relatively inexpensive choice.
- Siding: Choose siding that matches your home's style or complements your landscaping.
- Doors and Windows: Decide on the number and size of doors and windows based on your needs and the shed's location.
3. Tools and Materials List
Before you begin, create a detailed list of all the tools and materials you'll need. This includes everything from lumber and nails to measuring tapes, saws, and levels. Don't forget safety gear – safety glasses, work gloves, and hearing protection are essential.
Building Your 12x12 Shed: A Step-by-Step Overview
This is a simplified overview; detailed instructions will vary based on your chosen plan and materials. Always consult your chosen shed plans for specific guidance.
- Prepare the Site: Clear the area, level the ground, and prepare your foundation.
- Build the Frame: Construct the floor frame, wall frames, and roof frame according to your plans.
- Install the Roofing: Secure the roofing material to protect your shed from the weather.
- Add Siding and Trim: Install the exterior siding and add any trim to complete the exterior finish.
- Install Doors and Windows: Carefully install your doors and windows, ensuring they fit properly and seal well.
- Interior Finishing: Add shelving, a workbench, or other interior features as needed.
Tips for Success
Building a shed is a rewarding project, but it's essential to be prepared. Here are some tips for success:
- Take your time: Rushing the process can lead to mistakes.
- Read the plans carefully: Understand each step before you begin.
- Double-check your measurements: Accuracy is key to a well-built shed.
- Ask for help when needed: Don't be afraid to ask for assistance from friends or family if needed.
- Celebrate your accomplishment!: Enjoy the satisfaction of building something with your own hands.
Commonly Asked Questions
Here are some frequently asked questions about building a 12x12 shed:
- Q: Do I need a building permit? A: It depends on your local regulations. Check with your local building department before you start.
- Q: How much will it cost? A: The cost will vary depending on the materials you choose and the complexity of the design. Expect to spend anywhere from a few hundred to several thousand dollars.
- Q: How long will it take to build? A: The build time depends on your experience and the complexity of the design. Expect to spend several weekends, or even longer, for a complete build.
- Q: Can I build it myself? A: Yes, many DIYers successfully build 12x12 sheds. However, if you lack experience, consider seeking assistance or hiring a professional for certain tasks.
- Q: What kind of foundation do I need? A: The best foundation depends on your soil conditions and local codes. Options include concrete slabs, concrete piers, or gravel bases.
- Q: What if I need more space later? A: Carefully consider your future needs. While a 12x12 shed is a good starting point, think about possible expansion needs or whether a larger shed might be a better long-term investment.
Building a 12x12 shed is a significant project, but with careful planning and execution, it can be a very rewarding experience. Remember to prioritize safety, take your time, and enjoy the process! Happy building!
Barn-Style Shed Plans: Rustic and Spacious Storage Solution
Barn-Style Shed Plans: Rustic and Spacious Storage Solution
The timeless appeal of barn architecture has transcended its agricultural origins, finding renewed popularity in contemporary landscape design. Barn-style sheds, with their characteristic gambrel roofs and expansive interiors, offer a practical and aesthetically pleasing solution for a variety of storage needs. This comprehensive guide delves into the design considerations, construction techniques, and practical applications of building your own rustic and spacious barn-style shed.

Design Considerations: Planning Your Rustic Retreat
Before embarking on the construction process, meticulous planning is crucial to ensure the final structure meets your specific requirements and integrates seamlessly with your existing landscape. This involves several key considerations:

1. Shed Size and Functionality:
Determining the appropriate dimensions of your shed is paramount. Consider the intended purpose: Will it primarily serve as a tool shed, housing lawn equipment and gardening supplies? Or will it accommodate larger items such as recreational vehicles or workshop equipment? Accurate estimations of the required storage space will dictate the overall footprint of the structure. Furthermore, planning for future expansion possibilities can prevent potential limitations down the line.
2. Location and Site Preparation:
The chosen location significantly impacts both the aesthetics and functionality of the shed. Factors to consider include proximity to power sources, accessibility for vehicles, and the overall aesthetic integration with the surrounding environment. Site preparation involves clearing the area of debris, leveling the ground, and potentially addressing drainage issues to ensure a stable foundation. Local building codes and regulations should be reviewed to ensure compliance throughout the construction process.
3. Material Selection: Aesthetics and Durability:
The selection of building materials directly influences both the visual appeal and longevity of your barn-style shed. Natural wood, particularly rustic varieties like reclaimed barn wood or cedar, evokes the authentic barn aesthetic. However, it requires regular maintenance to protect against the elements. Alternatively, composite materials offer low-maintenance alternatives with similar aesthetic qualities. The choice depends on your budget, aesthetic preferences, and desired level of maintenance.
4. Roof Design and Style:
The gambrel roof is the quintessential feature of a barn-style shed, characterized by its distinctive double slope. This design not only provides ample headroom within the shed but also maximizes storage capacity in the loft area. The roof pitch is a crucial design element affecting both the aesthetic appeal and the shed's ability to shed snow and rain effectively. Consider the local climate when determining the optimal roof pitch.
Construction Techniques: Building Your Barn-Style Shed
Constructing a barn-style shed involves a series of steps requiring careful planning and execution. While hiring a professional contractor is always an option, many individuals find the process rewarding and cost-effective when undertaken as a DIY project.
1. Foundation: The Cornerstone of Stability:
A solid foundation is paramount to the long-term stability and durability of your shed. Several options exist, including concrete slabs, concrete piers, or even a gravel base for less permanent structures. The choice depends on the size and weight of the shed, as well as the soil conditions on your property. Ensuring a level foundation is crucial to prevent structural issues in the long run.
2. Framing the Structure: Creating the Skeleton:
The framing process involves constructing the shed's skeleton using pressure-treated lumber for the base and framing members. Precise measurements and accurate cutting are crucial to ensuring the structural integrity of the shed. The framing process typically involves building the walls, attaching them to the foundation, and then erecting the roof trusses. Careful adherence to building plans is vital at this stage.
3. Roofing Installation: Protecting Your Investment:
Roofing is a critical aspect, providing protection from the elements. Choosing the right roofing material is crucial; asphalt shingles are a popular and cost-effective option, while metal roofing offers superior durability. Proper installation techniques ensure waterproofing and prevent leaks. The installation of the gambrel roof requires careful attention to the double slope and the proper alignment of the rafters.
4. Siding and Trim: Adding the Finishing Touches:
The exterior siding contributes significantly to the overall aesthetic appeal of the barn-style shed. Traditional wood siding provides a rustic charm, while vinyl or composite siding offers low-maintenance alternatives. The addition of trim details enhances the visual appeal, complementing the barn-style aesthetic. Proper sealing and painting protect the siding from the elements, ensuring its longevity.
5. Interior Finishes: Creating a Functional Space:
The interior finish contributes to the functionality and usability of the shed. Adding shelving, workbenches, or other storage solutions maximizes the shed's storage capacity. Consider the flooring options carefully: concrete, wood, or composite materials each offer different advantages in terms of durability and maintenance.
Practical Applications and Customization Options
The versatility of barn-style sheds extends beyond simple storage. They can be adapted for various purposes, from workshops and studios to guest houses or even home offices.
Customization Options:
- Windows and Doors: Strategically placed windows provide natural light and ventilation, while adding charm. Consider oversized doors for easy access to larger equipment.
- Loft Space: The gambrel roof creates a usable loft area for additional storage or a small workspace.
- Electrical and Plumbing: Installing electrical outlets and lighting enhances the functionality of the shed, especially for workshops or studios. Adding plumbing allows for the inclusion of a sink or small bathroom.
- Insulation and Heating/Cooling: For year-round use, insulation improves energy efficiency and makes the shed more comfortable. Consider installing a small heating or cooling system for climate control.
Building a barn-style shed is a rewarding project that offers a blend of functionality and aesthetic appeal. By careful planning, attention to detail, and adherence to proper construction techniques, you can create a rustic and spacious storage solution that enhances your property for years to come.
Free Gable Roof Shed Plans: Download and Start Building Today
Free Gable Roof Shed Plans: Download and Start Building Today!
Tired of cluttered garages and overflowing storage spaces? Yearning for that extra room to house your gardening tools, outdoor equipment, or cherished hobby supplies? Building your own shed is a surprisingly achievable project, and with the right plans, it can be a rewarding and cost-effective endeavor. Forget expensive contractors and confusing instructions; this article provides you with access to free gable roof shed plans, allowing you to start building your dream storage solution today!

Why Choose a Gable Roof Shed?
Gable roofs, characterized by their triangular shape and dual sloping sides, offer numerous advantages. Their distinctive design provides excellent water runoff, minimizing the risk of leaks and water damage. This robust structure also lends itself well to various sizes and styles, making it a versatile choice for any backyard. The increased headroom within a gable roof shed allows for comfortable storage and movement, unlike some flatter roof designs that can feel cramped. Finally, the attractive aesthetics of a gable roof enhances your property's curb appeal, adding a touch of charm to your outdoor space.
Accessing Your Free Gable Roof Shed Plans
We understand finding reliable and easy-to-follow plans can be challenging. That's why we've compiled a selection of resources where you can download free gable roof shed plans. These plans provide detailed diagrams, material lists, and step-by-step instructions, ensuring a smooth building process. Remember to carefully review the plans before starting your project and adjust them to your specific needs and available materials. You'll find links to these valuable resources in the section below.

Where to Find Your Free Plans:
Several websites offer free gable roof shed plans. Be sure to select plans that align with your skill level and desired shed dimensions. Some popular options to explore include:
- Online woodworking forums and communities: Many enthusiastic DIYers share their detailed plans and experiences online.
- Home improvement websites: Reputable websites often feature free downloadable plans, sometimes requiring a simple registration.
- YouTube tutorials: Visual learners can benefit from video tutorials that walk you through each step of the building process.
Essential Considerations Before You Begin
Before you download plans and grab your tools, it's crucial to plan carefully. Check your local building codes and regulations to ensure your shed complies with all requirements. Consider the size of your shed based on your storage needs and available space in your yard. You also need to carefully assess the terrain and ensure you have a level foundation before commencing construction. Gathering all necessary tools and materials beforehand will streamline the construction process and prevent frustrating delays.
Building Your Shed: A Step-by-Step Overview
While the specific steps will vary depending on the plans you choose, the general process involves these key stages:
- Foundation preparation: This includes leveling the ground and constructing a sturdy base.
- Framing: Erecting the walls and roof structure according to your plans.
- Sheathing: Covering the framed structure with plywood or other suitable material.
- Roofing: Installing the chosen roofing material, ensuring a watertight seal.
- Siding: Adding the exterior finish to your shed.
- Finishing touches: Installing doors, windows, and any additional features.
Building your own gable roof shed is an incredibly rewarding experience. With free plans available and careful planning, you can create a valuable addition to your property. So, download those plans, gather your tools, and enjoy the satisfaction of creating something lasting and useful with your own two hands!
Best Flooring Options for a Gable Roof Shed: Strength and Durability
Optimizing Shed Flooring: A Comprehensive Guide to Strength and Durability for Gable Roof Structures
The selection of flooring for a gable roof shed is a critical decision impacting both its longevity and functionality. A poorly chosen floor can lead to premature structural damage, costly repairs, and compromised usability. This comprehensive guide explores various flooring options, examining their strengths, weaknesses, and suitability for gable roof sheds, considering factors such as load-bearing capacity, moisture resistance, and maintenance requirements. Ultimately, the optimal choice will depend on the intended use of the shed, the budget constraints, and the prevailing environmental conditions.

Factors Influencing Flooring Selection
Before delving into specific flooring materials, it's crucial to consider several key factors that will significantly impact the decision-making process. These factors are intrinsically linked and should be assessed holistically to ensure optimal flooring selection:

1. Intended Use of the Shed
The purpose of the shed dictates the required flooring strength and durability. A shed used for light storage will have vastly different flooring needs compared to one housing heavy machinery or used as a workshop. Heavy-duty applications demand robust materials capable of withstanding significant weight and impact.
2. Budgetary Constraints
Flooring materials vary significantly in price. While high-end options offer superior performance and longevity, they come with a higher initial investment. A realistic budget must be established to guide material selection, balancing desired performance with financial feasibility.
3. Environmental Conditions
The shed's location and climate will influence the susceptibility of the flooring to moisture damage, temperature fluctuations, and insect infestation. Areas with high humidity or frequent rainfall require materials with excellent moisture resistance to prevent rot and decay. Similarly, sheds in regions experiencing extreme temperature variations necessitate materials with good thermal stability.
4. Maintenance Requirements
Some flooring materials demand more intensive maintenance than others. Consider the time and effort available for cleaning, repairs, and periodic treatments. Low-maintenance options may prove more practical for individuals with limited time or resources.
Suitable Flooring Materials for Gable Roof Sheds
Numerous flooring options exist, each possessing unique properties making them more or less suitable for gable roof sheds. The following sections provide a detailed analysis of some of the most popular and effective choices:
1. Concrete Flooring
Concrete is a highly durable and robust flooring option, offering exceptional strength and load-bearing capacity. It's resistant to moisture and relatively easy to clean. However, it can be expensive to install, requiring specialized equipment and expertise. Further, concrete flooring can be cold and unforgiving on the feet, necessitating additional insulation or covering in colder climates.
2. Treated Lumber Flooring
Pressure-treated lumber provides a cost-effective and readily available solution. The treatment process enhances its resistance to rot, decay, and insect infestation. However, treated lumber requires proper sealing and regular maintenance to prolong its lifespan. It's also less durable than concrete and susceptible to damage from heavy impacts.
Choosing the right type of treated lumber is also crucial. Southern Yellow Pine or Douglas Fir are commonly used and offer a good balance of strength and durability. Ensure the lumber carries the appropriate certification for ground contact.
3. Engineered Wood Flooring
Engineered wood flooring, while typically used in homes, can offer a suitable option for sheds with moderate usage. It's more resistant to moisture than solid wood but still requires protection from excessive water exposure. Its aesthetic appeal may also make it a preferable choice for sheds used as workshops or studios.
4. Composite Decking
Composite decking materials, often made from recycled plastic and wood fibers, provide a durable and low-maintenance alternative. They are resistant to rot, decay, and insect damage, requiring minimal upkeep. They are also relatively easy to install. However, composite decking can be more expensive than treated lumber and may not be as strong under extremely heavy loads.
5. Plywood Flooring
Plywood offers a cost-effective solution for sheds with light to moderate usage. It's relatively easy to install and provides a level surface. However, plywood is susceptible to moisture damage and is not as strong or durable as concrete or treated lumber. Exterior-grade plywood treated with waterproofing agents is recommended for increased longevity.
Installation Considerations
Regardless of the chosen material, proper installation is critical for ensuring the longevity and structural integrity of the shed floor. Key considerations include:
- Proper leveling of the ground: A level base is essential for preventing uneven settling and potential damage to the flooring.
- Use of appropriate underlayment: Depending on the chosen flooring, an appropriate underlayment may be needed to provide additional insulation, moisture protection, and leveling.
- Adequate ventilation: Ensure sufficient ventilation beneath the flooring to prevent moisture buildup.
- Secure fastening: Use appropriate fasteners to securely attach the flooring to the substructure, ensuring stability and load-bearing capacity.
Conclusion
Selecting the appropriate flooring for a gable roof shed requires careful consideration of various factors, including intended use, budget, environmental conditions, and maintenance requirements. While concrete provides unparalleled strength and durability, other options like pressure-treated lumber, composite decking, and engineered wood offer viable alternatives depending on specific needs and preferences. By carefully evaluating these factors and considering the installation process, shed owners can ensure a long-lasting and functional flooring system that enhances both the usability and longevity of their structures.